Computers

Getting Started

  • 1.1.Setting up Your Debix Model A
    • 1.1.1. Optional Items
    • 1.1.2.Troubleshooting
  • 1.2.Installing the Operating System
    • 1.2.1. Downloading an Image
  • 1.3.Installing Images on Linux
  • 1.4.Installing Images on Mac OS
  • 1.5.Installing Images on Windows
  • 1.6.SD Card for Debix Model A
    • 1.6.1 Recommended Capacity
    • 1.6.2 Troubleshooting
  • 1.7.Connecting a Display
    • 1.7.1. Connecting Using HDMI
    • 1.7.2. Connecting Using DVI
    • 1.7.3. Connecting Using VGA

DEBIX Model A OS

Configuration

  • 3.1.Configuring Networking
    • 3.1.1.Using the Desktop
    • 3.1.2.Using the Command Line
  • 3.2.HDMI Configuration
  • 3.3.Rotating your Display
  • 3.4.External Storage Configuration
    • 3.4.1.Mounting a Storage Device
    • 3.4.2.Setting up Automatic Mounting
    • 3.4.3.Unmounting a Storage Device
  • 3.5.Localizing your Debix
    • 3.5.1.Changing the Language
    • 3.5.2.Configuring the Keyboard
    • 3.5.3.Changing the Timezone
  • 3.6.Securing your Debix
    • 3.6.1.Change the Default Password
    • 3.6.2.Improving SSH Security
    • 3.6.3.Install a Firewall
    • 3.6.4.Installing fail2ban
  • 3.7.Configuring Screen Blanking
    • 3.7.1 On Console
    • 3.7.2. On the Desktop

The config.txt File

The Linux Kernel

  • 5.1.Kernel
  • 5.2.Building the Kernel
    • 5.2.1.Building the Kernel Locally
    • 5.2.2.Cross-Compiling the Kernel
  • 5.3.Configuring the Kernel
    • 5.3.1.Preparing to Configure
    • 5.3.2.Using menuconfig
    • 5.3.3.Saving your Changes

Using Linux

  • 6.1. Terminal
    • 6.1.1. Opening a Terminal Window
    • 6.1.2. Navigating and Browsing Your Debix
    • 6.1.3. History and Auto-complete
    • 6.1.4. The sudo Command
    • 6.1.5. Installing Software Using apt
    • 6.1.6. Other Useful Commands
    • 6.1.7. Finding out about a Command
  • 6.2. The Linux File System
    • 6.2.1. Home
  • 6.3. Linux Commands
    • 6.3.1 Filesystem
    • 6.3.2. Search
    • 6.3.3. Networking
  • 6.4. Text Editors
    • 6.4.1. Text Editors in the Terminal
  • 6.5. Linux Users
    • 6.5.1. Changing Your Password
    • 6.5.2. Creating a New User
    • 6.5.3. Deleting a User
  • 6.6. Root and sudo
    • 6.6.1. The sudo Command
    • 6.6.2. The sudo’ers List
  • 6.7. The .bashrc File
    • 6.7.1. The .bash_aliases File
  • 6.8. Shell Scripts
  • 6.9. Scheduling Tasks with cron
    • 6.9.1. Editing the crontab File
    • 6.9.2. Adding a Scheduled Task
    • 6.9.3. Viewing Scheduled Tasks
    • 6.9.4. Erase Scheduled Tasks
    • 6.9.5. Running a Task on Reboot
  • 6.10. The systemd Daemon
    • 6.10.1. Creating a Service

Remote Access

  • 7.1.Introduction to Remote Access
    • 7.1.1.How to Find your IP Address
  • 7.2.Setting up an SSH Server
    • 7.2.1.Set up your Local Network
    • 7.2.2.Enabling the Server
  • 7.3.Secure Shell from Linux or Mac OS
  • 7.4.Secure Shell from Windows 10
  • 7.5.Passwordless SSH Access
    • 7.5.1.Checking for Existing SSH Keys
    • 7.5.2.Generate new SSH Keys
    • 7.5.3.Copy your Key to your Debix
  • 7.6.Using Secure Copy
    • 7.6.1.Copying Files to your Debix
    • 7.6.2.Copying Files from your Debix
    • 7.6.3.Copying Multiple Files
    • 7.6.4.Copying a Whole Directory
  • 7.7.Using rsync
  • 7.8.Network File System (NFS)
    • 7.8.1.Setting up a Basic NFS Server
    • 7.8.2.Configuring an NFS Client
  • 7.9.Samba (SMB/CIFS)
    • 7.9.1.Installing Samba Support
    • 7.9.2.Mount a Folder Shared from Windows
    • 7.9.3.Sharing a Folder from your Debix to Windows10
  • 7.10.Setting up an Apache Web Server
    • 7.10.1.Installing Apache
    • 7.10.2.Test the Web Server
    • 7.10.3.Installing PHP for Apache

DEBIX Hardware

  • 8.1.DEBIX Model A

Compute Module Hardware

Processors

  • 10.1.NXP i.MX 8M Plus
Getting Started
  • 1.1.Setting up Your Debix Model A

    To get started with your Debix Model A computer you’ll need the following accessories:

    A computer monitor, or television. Most should work as a display for debix model a, but for best results, you should use a display with HDMI input, you'll also need an approriate display cable, to connect your monitor to your debix model a.

    A computer monitor, or television. Most should work as a display for Debix Model A, but for best results, you should use a display with HDMI input. You’ll also need an appropriate display cable, to connect your monitor to your Debix Model A.

    Note

    If your display uses an HDMI connection and has built-in speakers, you can use it to output sound.

    lAny standard USB keyboard and mouse will work with your Debix Model A.A computer keyboard and mouse

    lWireless keyboards and mice will work if already paired.

    A good quality power supply.

    We recommend the official Debix Model A Power Supply which has been specifically designed to consistently provide +5V despite rapid fluctuations in current draw.(The power supply can be bought on website xxxxxxxx). Those fluctuations in demand is something that happens a lot with when you’re using peripherals with the Debix Model A, and something that other supplies—designed to provide consistent current for charging cellphones—usually don’t cope with all that well. 

    Debix Model A use type C power supply. 

    Finally you'll need an SD card; we recommend a minimum of 8GB micro SD card, and to use the Etcher to install an operating system onto it.

    @SpringBootApplication
    public class DemoApplication {
    
        public static void main(String[] args) {
            SpringApplication.run(DemoApplication.class, args);
        }
    
    }
    											

    1.1.1. Optional Items

    A network (Ethernet) cable to connect your Debix Model A to your local network and the Internet. 

    If you aren’t using an HDMI monitor with speakers you might also need some form of sound hardware. Audio can be played through headphones by connecting it to headphone interface.

    1.1.2.Troubleshooting

    You can get help with setting up your Debix Model A in our discord.


  • 1.2.Installing the Operating System

    Debix Model A recommend the use of Etcher to install an operating system on your SD card. You will need another computer with an SD card reader to install the image.

    Note

    Before you start, don’t forget to check the SD card requirements.

    1.2.1. Downloading an Image

    Whether will you use Etcher or other tool to write image to your SD Card, you need to download the image first, then use the tool to write it to the SD card. Images for Debix Model A computers are available from some third-party vendors.

    You may need to unzip the downloaded file (.zip) to get the image file (.img) you need to write to the card.


  • 1.3.Installing Images on Linux

    Etcher is typically the easiest option for most users to write images to SD cards, so it is a good place to start. If you’re looking for more advanced options on Linux, you can use the standard command line tools below.

    Note

    Using the dd tool can overwrite any partition of your machine. If you specify the wrong device when using dd, you could delete your primary Linux partition. Please be careful.

    lRun lsblk -p to see which devices are currently connected to your machine.Discovering the SD Card mountpoint and unmounting it

    lIf your computer has a slot for SD cards, insert the card. If not, insert the card into an SD card reader, then connect the reader to your computer.

    lRun lsblk -p again. The new device that has appeared is your SD card (you can also usually tell from the listed device size). The naming of the device will follow the format described in the next paragraph.

    lThe left column of the results from the lsblk -p command gives the device name of your SD card and the names of any partitions on it (usually only one, but there may be several if the card was previously used). It will be listed as something like /dev/mmcblk0 or /dev/sdX (with partition names /dev/mmcblk0p1 or /dev/sdX1 respectively), where X is a lower-case letter indicating the device (eg. /dev/sdb1). The right column shows where the partitions have been mounted (if they haven’t been, it will be blank).

    lIf any partitions on the SD card have been mounted, unmount them all with umount, for example umount /dev/sdX1 (replace sdX1 with your SD card’s device name, and change the number for any other partitions).

    Copying the Image to the SD Card

    lIn a terminal window, write the image to the card with the command below, making sure you replace the input file if= argument with the path to your .img file, and the /dev/sdX in the output file of= argument with the correct device name. This is very important, as you will lose all the data on the hard drive if you provide the wrong device name. Make sure the device name is the name of the whole SD card as described above, not just a partition. For example: sdd, not sdds1 or sddp1; mmcblk0, not mmcblk0p1.

    sudo dd if=debix-ubuntu-20211022.img of=/dev/sdX bs=4M conv=fsync

    lPlease note that block size set to 4M will work most of the time. If not, try 1M, although this will take considerably longer.

    Copying a Zipped Image to the SD Card

    lIn Linux it is possible to combine the unzip and SD copying process into one command, which avoids any issues that might occur when the unzipped image is larger than 4GB. This can happen on certain filesystems that do not support files larger than 4GB (e.g. FAT), although it should be noted that most Linux installations do not use FAT and therefore do not have this limitation.

    lThe following command unzips the zip file (replace debix-ubuntu-20211022.bz2 with the appropriate zip filename), and pipes the output directly to the dd command. This in turn copies it to the SD card, as described in the previous section.

    bunzip2 -c debix-ubuntu-20211022.bz2 | sudo dd of=/dev/sdX bs=4M conv=fsync

    Checking the Image Copy Progress

    lBy default, the dd command does not give any information about its progress, so it may appear to have frozen. It can take some time to finish writing to the card. If your card reader has an LED, it may blink during the write process.

    lTo see the progress of the copy operation, you can run the dd command with the status option.

    sudo dd if=debix-ubuntu-20211022.img of=/dev/sdX bs=4M conv=fsync status=progress

    lIf you are using an older version of dd, the status option may not be available. You may be able to use the dcfldd command instead, which will give a progress report showing how much has been written. Another method is to send a USR1 signal to dd, which will let it print status information. Find out the PID of dd by using pgrep -l dd or ps a | grep dd. Then use kill -USR1 PID to send the USR1 signal to dd.

    Optional: Checking Whether the Image was Correctly Written to the SD Card

    lAfter dd has finished copying, you can check what has been written to the SD card by dd-ing from the card back to another image on your hard disk, truncating the new image to the same size as the original, and then running diff (or md5sum) on those two images.

    lIf the SD card is much larger than the image, you don’t want to read back the whole SD card, since it will be mostly empty. So you need to check the number of blocks that were written to the card by the dd command. At the end of its run, dd will have displayed the number of blocks written as follow:

    xxx+0 records in

    yyy+0 records out

    yyyyyyyyyy bytes (yyy kB, yyy KiB) copied, 0.00144744 s, 283 MB/s

    We need the number xxx, which is the block count. We can ignore the yyy numbers.

    lCopy the SD card content to an image on your hard drive using dd again:

    sudo  dd if=/dev/sdX of=from-sd-card.img bs=4M count=xxx

    if is the input file (i.e. the SD card device), of is the output file to which the SD card content is to be copied (called from-sd-card.img in this example), and xxx is the number of blocks written by the original dd operation.

    lIn case the SD card image is still larger than the original image, truncate the new image to the size of the original image using the following command (replace the input file reference argument with the original image name):

    sudo truncate --reference debix-ubuntu-20211022.img from-sd-card.img

    lCompare the two images: diff should report that the files are identical.

    diff -s from-sd-card.img debix-ubuntu-20211022.img

    lRun sync. This will ensure that the write cache is flushed and that it is safe to unmount your SD card.

    lRemove the SD card from the card reader.


  • 1.4.Installing Images on Mac OS

    Etcher is the recommended option for most users to write images to SD cards. However, if you do not want to use the Etcher you can still copy an operating system to the card from the command line.

    Finding the SD Card

    Insert the SD card in the slot, or connect the SD card reader with the SD card inside, and type diskutil list at the command line. You should see something like this,

     /dev/disk0 (internal):

          #:                   TYPE NAME                    SIZE       IDENTIFIER

          0:                   GUID_partition_scheme        500.3 GB     disk0

          1:                   EFI EFI                      314.6 MB     disk0s1

          2:                   Apple_APFS Container disk1     500.0 GB     disk0s2


      /dev/disk1 (synthesized):

          #:                   TYPE NAME                    SIZE       IDENTIFIER

          0:                   APFS Container Scheme -      +500.0 GB     disk1

                               Physical Store disk0s2

          1:                   APFS Volume Macintosh HD     89.6 GB      disk1s1

          2:                   APFS Volume Preboot          47.3 MB      disk1s2

          3:                   APFS Volume Recovery         510.4 MB     disk1s3

          4:                   APFS Volume VM               3.6 GB       disk1s4


      /dev/disk2 (external, physical):

          #:                   TYPE NAME                    SIZE       IDENTIFIER

          0:                   FDisk_partition_scheme       *15.9 GB      disk2

          1:                   Windows_FAT_32 boot          268.4 MB    disk2s1

          2:                   Linux                        15.7 GB      disk2s2

    Here the SD Card is /dev/disk2 however your disk and partition list may vary.

    Copying the Image

    Warning

    Using the dd command line tool can overwrite your Mac’s operating system if you specify the wrong disk device. If you’re not sure about what to do, we recommend you use the Etcher.

    diskutil unmountDisk /dev/diskN

    Before copying the image you should unmount the SD Card.

    You can then copy the image,

    sudo dd bs=1m if=path_of_your_image.img of=/dev/rdiskN; syn

    replacing N with the disk number.

    Note

    You should use rdisk (which stands for 'raw disk') instead of disk, this speeds up the copying

    sudo diskutil eject /dev/rdiskN

    This can take a few minutes, depending on the image file size. You can check the progress by pressing Ctrl+T. After the dd command finishes, you can eject the card:

    Troubleshooting

    lIf the command reports dd: /dev/rdiskN: Resource busy, you need to unmount the volume first sudo diskutil unmountDisk /dev/diskN.

    lIf the command reports dd: bs: illegal numeric value, change the block size bs=1m to bs=1M.

    lIf the command reports dd: /dev/rdiskN: Operation not permitted, go to System Preferences -> Security & Privacy -> Privacy -> Files and Folders -> Give Removable Volumes access to Terminal.

    lIf the command reports dd: /dev/rdiskN: Permission denied, the partition table of the SD card is being protected against being overwritten by mac OS.

    Erase the SD card’s partition table using this command:

    sudo diskutil partitionDisk /dev/diskN 1 MBR "Free Space" "%noformat%" 100%

    That command will also set the permissions on the device to allow writing.


  • 1.5.Installing Images on Windows

    balenaEtcher is our recommended option for most users to write images to SD cards, so it is a good place to start. If you’re looking for an alternative on Windows, you can use Win32DiskImager.


    balenaEtcher

    lDownload the Windows installer from balena.io (https://www.balena.io/etcher/)

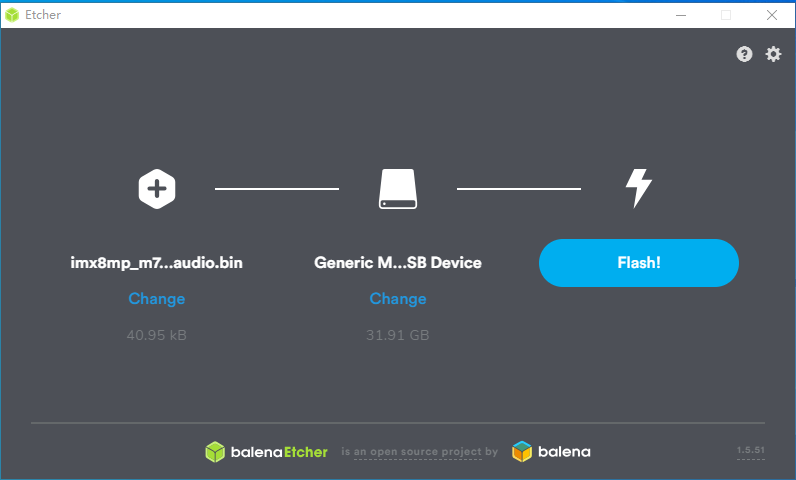
    lRun balenaEtcher and select the corresponding unzipped OS image file

    lSelect the SD card drive

    lFinally, click Flash to write the corresponding OS image to the SD card

    lYou’ll see a progress bar. Once complete, a notification Flash Complete! will show, the utility will automatically unmount the SD card so it’s safe to remove it from your computer.

      Win32DiskImager

    lInsert the SD card into your SD card reader. You can use the SD card slot if you have one, or an SD adapter in a USB port. Note the drive letter assigned to the SD card. You can see the drive letter in the left hand column of Windows Explorer, for example G:

    lDownload the Win32DiskImager utility from the Sourceforge Project page as an installer file, and run it to install the software.

    lRun the Win32DiskImager utility from your desktop or menu.

    lSelect the image file you extracted earlier.

    lIn the device box, select the drive letter of the SD card. Be careful to select the correct drive: if you choose the wrong drive you could destroy the data on your computer’s hard disk! If you are using an SD card slot in your computer, and can’t see the drive in the Win32DiskImager window, try using an external SD adapter.

    lClick 'Write' and wait for the write to complete.

    lExit the imager and eject the SD card.


  • 1.6.SD Card for Debix Model A

    Debix Model A computers use a micro SD card.

    1.6.1 Recommended Capacity

    We recommend using an SD card of 8GB or greater capacity with Debix Model A OS. Other operating systems have different requirements: for example, LibreELEC can run from a smaller card. Please check with the supplier of the operating system to find out what capacity of card they recommend.

    1.6.2 Troubleshooting

    We recommend buying an SD card from one of our official resellers. The official SD cards are micro SD cards and are supplied with an adaptor which allows them to be used in a full-sized SD card slot.


    If you are having problems with your SD card:

    lMake sure you are using a genuine SD card. The best way to avoid fake SD cards is to always buy from a reputable supplier.

    lMake sure you are using a good quality power supply: we recommend using an official Debix Model A power supply.

    lThe cable from the power supply unit to the Debix Model A can also cause problems. This is usually due to the resistance of the wires in the USB power cable; to save money, USB cables have as little copper in them as possible, which causes a voltage drop across the cable.

    lMake sure you shut down the operating system correctly before you power down the Debix Model A.


  • 1.7.Connecting a Display

    Unless you’re setting up your Debix Model A to operate headless, for regular use you’ll want to plug the Debix Model A in to a display: either a computer monitor, or a televison.

    1.7.1. Connecting Using HDMI

    The Debix Model A has an HDMI port which you can connect directly to a monitor or TV with an HDMI cable. This is the easiest solution; some modern monitors and TVs have HDMI ports, some do not, but there are other options.

     If you’re using your Debix Model A with a monitor with built-in speakers and are connecting to it using an HDMI cable you can also use it to output sound.

    1.7.2. Connecting Using DVI

    For monitors with a DVI port, you can use an HDMI-to-DVI cable, or an HDMI cable with a DVI adapter. 

    Note

    Unlike HDMI the DVI standard does not support audio

    1.7.3. Connecting Using VGA

    For monitors with VGA only, you can use an HDMI-to-VGA adapter. Note that VGA does not support audio.


DEBIX Model A OS
Configuration
  • 3.1.Configuring Networking

    A GUI is provided for setting up wireless connections in Debix OS within the Debix Desktop. However if you are not using the Debix Desktop, you can set up wireless networking from the command line.

    3.1.1.Using the Desktop

    Wireless connections can be made via the network icon at the right-hand end of the menu bar. If you are using a Debix with built-in wireless connectivity, or if a wireless dongle is plugged in, left-clicking this icon will bring up a list of available wireless networks, as shown below. If no networks are found, it will show the message 'No APs found - scanning…'. Wait a few seconds without closing the menu, and it should find your network.

    Note that on Debix devices that support the 5GHz band, wireless networking is enabled by default.

    The icons on the right show whether a network is secured or not, and give an indication of its signal strength. Click the network that you want to connect to. If it is secured, a dialogue box will prompt you to enter the network key:

    Enter the key and click OK, then wait a couple of seconds. The network icon will flash briefly to show that a connection is being made. When it is ready, the icon will stop flashing and show the signal strength.

    3.1.2.Using the Command Line

    Getting Wireless LAN Network Details

    To scan for wireless networks, run command sudo apt install wireless-tools to install iwlist, use the command sudo iwlist wlan0 scan. This will list all available wireless networks, along with other useful information. Look out for:

    • 'ESSID:"polyhex_mi"' is the name of the wireless network.
    • 'IE: IEEE 802.11i/WPA2 Version 1' is the authentication used. In this case it’s WPA2, the newer and more secure wireless standard which replaces WPA. This guide should work for WPA or WPA2, but may not work for WPA2 enterprise. You’ll also need the password for the wireless network. For most home routers, this is found on a sticker on the back of the router. The ESSID (ssid) for the examples below is polyhex_mi and the password (psk) is bohai2021.

    Adding the Network Details to your Debix

    Create the wpa-supplicant configuration file in vim:

    sudo vim /etc/wpa_supplicant/wpa_supplicant.conf

    Go to the bottom of the file and add the following:

    network={

       ssid="polyhex_mi"

       psk="bohai2021"

    }

    The password can be configured either as the ASCII representation, in quotes as per the example above, or as a pre-encrypted 32 byte hexadecimal number. You can use the wpa_passphrase utility to generate an encrypted PSK. This takes the SSID and the password, and generates the encrypted PSK. With the example from above, you can generate the PSK with wpa_passphrase "polyhex_mi". Then you will be asked for the password of the wireless network (in this case bohai2021). The output is as follows:

     network={

     ssid="polyhex_mi"

     #psk="bohai2021"

     psk=131e1e221f6e06e3911a2d11ff2fac9182665c004de85300f9cac208a6a80531

     }

    Note that the plain text version of the code is present, but commented out. You should delete this line from the final wpa_supplicant file for extra security.

    The wpa_passphrase tool requires a password with between 8 and 63 characters. To use a more complex password, you can extract the content of a text file and use it as input for wpa_passphrase. Store the password in a text file and input it to wpa_passphrase by calling wpa_passphrase "polyhex_mi" < file_where_password_is_stored. For extra security, you should delete the file_where_password_is_stored afterwards, so there is no plain text copy of the original password on the system.

    Now save the file by pressing Esc, then input :wq to save the file and exit.

    Run command sudo wpa_supplicant -i wlan0 -B -c /etc/wpa_supplicant/wpa_supplicant.conf

    Note

    If there is a notification shows that the device is busy, run command sudo killall wpa_supplicant, and then run the wpa_supplicant command above again.

    Run command sudo apt install isc-dhcp-client to get dhclient command.

    Run command sudo dhcient wlan0 (Note, if there is no wlan0 in output of command  ifconfig, you need to run sudo ifconfig wlan0 up beforehand)

    You can verify whether it has successfully connected using ifconfig wlan0. If the inet addr field has an address beside it, the Debix has connected to the network. If not, check that your password and ESSID are correct.

    Using Unsecured Networks

    If the network you are connecting to does not use a password, the wpa_supplicant entry for the network will need to include the correct key_mgmt entry. e.g.

    network={

       ssid="polyhex_mi"

       key_mgmt=NONE

    }

    Warning

    You should be careful when using unsecured wireless networks.

    Hidden Networks

    If you are using a hidden network, an extra option in the wpa_supplicant file, scan_ssid, may help connection.

    network={

      ssid="yourHiddenSSID"

      scan_ssid=1

      psk="Your_wireless_network_password"

    }

    You can verify whether it has successfully connected using ifconfig wlan0. If the inet addr field has an address beside it, the Raspberry Pi has connected to the network. If not, check your password and ESSID are correct.

  • 3.2.HDMI Configuration

    In the vast majority of cases, simply plugging your HDMI-equipped monitor into the Debix using a standard HDMI cable will automatically lead to the Debix using the best resolution the monitor supports.

    The Debix can drive one display, with a resolution up to 1080p at a 120Hz refresh rate.

  • 3.3.Rotating your Display
    You can rotate your display from the desktop on Debix. Open Settings then Displays and then set the Orientation to your desired value.
  • 3.4.External Storage Configuration

    You can connect your external hard disk, SSD, or USB stick to any of the USB ports on the Raspberry Pi, and mount the file system to access the data stored on it.

    To set up your storage device so that it always mounts to a specific location of your choice, you must mount it manually.

    3.4.1.Mounting a Storage Device

    You can mount your storage device at a specific folder location. It is conventional to do this within the /mnt folder, for example /mnt/mydisk. Note that the folder must be empty.

    • Plug the storage device into a USB port on the Debix.
    • List all the disk partitions on the Debix using the following command:

    sudo lsblk -o UUID,NAME,FSTYPE,SIZE,MOUNTPOINT,LABEL,MODEL

    • Use the SIZE, LABEL, and MODEL columns to identify the name of the disk partition that points to your storage device. For example, sda1.
    • The FSTYPE column contains the filesystem type. If your storage device uses an exFAT file system, install the exFAT driver:

    sudo apt update

    sudo apt install exfat-fuse

    • If your storage device uses an NTFS file system, you will have read-only access to it. If you want to write to the device, you can install the ntfs-3g driver:

    sudo apt update

    sudo apt install ntfs-3g

    • Run the following command to get the location of the disk partition:

    sudo blkid
    For example, /dev/sda1.

    • l Create a target folder to be the mount point of the storage device. The mount point name used in this case is mydisk. You can specify a name of your choice:

    sudo mkdir /mnt/mydisk

    • Mount the storage device at the mount point you created:

    sudo mount /dev/sda1 /mnt/mydisk

    • l Verify that the storage device is mounted successfully by listing the contents:

    ls /mnt/mydisk

    3.4.2.Setting up Automatic Mounting

    You can modify the fstab file to define the location where the storage device will be automatically mounted when the Debix starts up. In the fstab file, the disk partition is identified by the universally unique identifier (UUID).

    • Get the UUID of the disk partition:

    sudo blkid

    • Find the disk partition from the list and note the UUID. For example, 5C24-1453.
    • Open the fstab file using a command line editor such as nano:

    sudo nano /etc/fstab

    • Add the following line in the fstab file:

    UUID=5C24-1453 /mnt/mydisk fstype defaults,auto,users,rw,nofail 0 0

    Replace fstype with the type of your file system, which you found in step 2 of 'Mounting a storage device' above, for example: ntfs.

    • If the filesystem type is FAT or NTFS, add, umask=000 immediately after nofail - this will allow all users full read/write access to every file on the storage device.

    Now that you have set an entry in fstab, you can start up your Debix with or without the storage device attached. Before you unplug the device you must either shut down the Debix, or manually unmount it using the steps in 'Unmounting a storage device' below.

    For more information on each Linux command, refer to the specific manual page using the man command. For example, man fstab.

    3.4.3.Unmounting a Storage Device

    When the Debix shuts down, the system takes care of unmounting the storage device so that it is safe to unplug it. If you want to manually unmount a device, you can use the following command:

    sudo umount /mnt/mydisk
    If you receive an error that the 'target is busy', this means that the storage device was not unmounted. If no error was displayed, you can now safely unplug the device.

    Dealing with 'target is busy'

    The 'target is busy' message means there are files on the storage device that are in use by a program. To close the files, use the following procedure.


    • Close any program which has open files on the storage device.
    • If you have a terminal open, make sure that you are not in the folder where the storage device is mounted, or in a sub-folder of it.
    • If you are still unable to unmount the storage device, you can use the lsof tool to check which program has files open on the device. You need to first install lsof using apt:


    sudo apt update

    sudo apt install lsof

    To use lsof:

    lsof /mnt/mydisk


  • 3.5.Localizing your Debix
    You can set your Debix up to match your regional settings.

    3.5.1.Changing the Language

    If you want to select a different language, configure in Settings from the desktop.

    3.5.2.Configuring the Keyboard

    If you want to select a different keyboard, configure in Settings from the desktop.

    3.5.3.Changing the Timezone

    Once again, this is something you can change in Settings from the desktop.
  • 3.6.Securing your Debix

    The security of your Debix is important. Gaps in security leave your Debix open to hackers who can then use it without your permission.

    What level of security you need depends on how you wish to use your Debix. For example, if you are simply using your Debix on your home network, behind a router with a firewall, then it is already quite secure by default.

    However, if you wish to expose your Debix directly to the internet, either with a direct connection (unlikely) or by letting certain protocols through your router firewall (e.g. SSH), then you need to make some basic security changes.

    Even if you are hidden behind a firewall, it is sensible to take security seriously. This documentation will describe some ways of improving the security of your Debix. Please note, though, that it is not exhaustive.

    3.6.1.Change the Default Password

    The default username and password is used for every single Debix running Debix OS. So, if you can get access to a Debix, and these settings have not been changed, you have root access to that Debix.

    So the first thing to do is changing the password. This can be done via command passwd, you can type in your new password and confirm it.

    passwd

    3.6.2.Improving SSH Security

    SSH is a common way of accessing a Debix remotely. By default, logging in with SSH requires a username/password pair, and there are ways to make this more secure. An even more secure method is to use key based authentication.

    Improving username/password security

    The most important thing to do is ensure you have a very robust password. If your Debix is exposed to the internet, the password needs to be very secure. This will help to avoid dictionary attacks or the like.

    You can also allow or deny specific users by altering the sshd configuration.

    sudo nano /etc/ssh/sshd_config
    Add, edit, or append to the end of the file the following line, which contains the usernames you wish to allow to log in:

    AllowUsers alice bob
    You can also use DenyUsers to specifically stop some usernames from logging in:
    DenyUsers jane john

    After the change you will need to restart the sshd service using sudo systemctl restart ssh or reboot so the changes take effect.

    Using key-based authentication

    Key pairs are two cryptographically secure keys. One is private, and one is public. They can be used to authenticate a client to an SSH server (in this case the Debix).

    The client generates two keys, which are cryptographically linked to each other. The private key should never be released, but the public key can be freely shared. The SSH server takes a copy of the public key, and, when a link is requested, uses this key to send the client a challenge message, which the client will encrypt using the private key. If the server can use the public key to decrypt this message back to the original challenge message, then the identity of the client can be confirmed.

    Generating a key pair in Linux is done using the ssh-keygen command on the client; the keys are stored by default in the .ssh folder in the users home directory. The private key will be called id_rsa and the associated public key will be called id_rsa.pub. The key will be 2048 bits long: breaking the encryption on a key of that length would take an extremely long time, so it is very secure. You can make longer keys if the situation demands it. Note that you should only do the generation process once: if repeated, it will overwrite any previous generated keys. Anything relying on those old keys will need to be updated to the new keys.

    You will be prompted for a passphrase during key generation: this is an extra level of security. For the moment, leave this blank.

    The public key now needs to be moved on to the server(use scp or some other tools to complete it)

    Finally, we need to disable password logins, so that all authentication is done by the key pairs.

    sudo nano /etc/ssh/sshd_config
    There are three lines that need to be changed to no, if they are not set that way already:

    ChallengeResponseAuthentication no

    PasswordAuthentication no

    UsePAM no

    Save the file and either restart the ssh system with sudo service ssh reload or reboot.


    3.6.3.Install a Firewall

    There are many firewall solutions available for Linux. Most use the underlying iptables project to provide packet filtering. This project sits over the Linux netfiltering system. iptables is installed by default on Debix OS, but is not set up. Setting it up can be a complicated task, and one project that provides a simpler interface than iptables is ufw, which stands for 'Uncomplicated Fire Wall'. This is the default firewall tool in Ubuntu, and can be easily installed on your Debix:

    sudo apt install ufw

    ufw is a fairly straightforward command line tool, although there are some GUIs available for it. This document will describe a few of the basic command line options. Note that ufw needs to be run with superuser privileges, so all commands are preceded with sudo.

    To enable the firewall, which will also ensure it starts up on boot, use:

    sudo ufw enable
    To disable the firewall, and disable start up on boot, use:


    sudo ufw disable
    Allow a particular port to have access (we have used port 22 in our example):

    sudo ufw allow 22
    Denying access on a port is also very simple (again, we have used port 22 as an example):

    sudo ufw deny 22
    You can also specify which service you are allowing or denying on a port. In this example, we are denying tcp on port 22:

    sudo ufw deny 22/tcp
    You can specify the service even if you do not know which port it uses. This example allows the ssh service access through the firewall:
    sudo ufw allow ssh
    The status command lists all current settings for the firewall:
    sudo ufw status

    The rules can be quite complicated, allowing specific IP addresses to be blocked, specifying in which direction traffic is allowed, or limiting the number of attempts to connect, for example to help defeat a Denial of Service (DoS) attack. You can also specify the device rules are to be applied to (e.g. eth0, wlan0). Please refer to the ufw man page (man ufw) for full details, but here are some examples of more sophisticated commands.

    Limit login attempts on ssh port using tcp: this denies connection if an IP address has attempted to connect six or more times in the last 30 seconds:

    sudo ufw limit ssh/tcp
    Deny access to port 30 from IP address 192.168.2.1
    sudo ufw deny from 192.168.2.1 port 30


    3.6.4.Installing fail2ban

    If you are using your Debix as some sort of server, for example an ssh or a webserver, your firewall will have deliberate 'holes' in it to let the server traffic through. In these cases, Fail2ban can be useful. Fail2ban, written in Python, is a scanner that examines the log files produced by Debix, and checks them for suspicious activity. It catches things like multiple brute-force attempts to log in, and can inform any installed firewall to stop further login attempts from suspicious IP addresses. It saves you having to manually check log files for intrusion attempts and then update the firewall (via iptables) to prevent them.

    Install fail2ban using the following command:

    sudo apt install fail2ban
    On installation, Fail2ban creates a folder /etc/fail2ban in which there is a configuration file called jail.conf. This needs to be copied to jail.local to enable it. Inside this configuration file are a set of default options, together with options for checking specific services for abnormalities. Do the following to examine/change the rules that are used for ssh:

    sudo cp /etc/fail2ban/jail.conf /etc/fail2ban/jail.local

    sudo nano /etc/fail2ban/jail.local

    Add the following section to the jail.local file. On some versions of fail2ban this section may already exist, so update this pre-existing section if it is there.

    [sshd]


    # To use more aggressive sshd modes set filter parameter "mode" in jail.local:

    # normal (default), ddos, extra or aggressive (combines all).

    # See "tests/files/logs/sshd" or "filter.d/sshd.conf" for usage example and details.

    #mode   = normal

    enabled = true

    port    = ssh

    logpath = %(sshd_log)s

    backend = %(sshd_backend)s

    maxretry = 6

    The logpath is defined in paths-common.conf, it’s /var/log/auth.log, to achieve this file by default, on Debix, we need to run sudo apt install rsyslog beforehand.

    If you want to permanently ban an IP address after three failed attempts, you can change the maxretry value in the [ssh] section, and set the bantime to a negative number:

    [sshd]


    # To use more aggressive sshd modes set filter parameter "mode" in jail.local:

    # normal (default), ddos, extra or aggressive (combines all).

    # See "tests/files/logs/sshd" or "filter.d/sshd.conf" for usage example and details.

    #mode   = normal

    enabled = true

    port    = ssh

    logpath = %(sshd_log)s

    backend = %(sshd_backend)s

    maxretry = 3

    bantime=-1

    Each time we change the fail2ban configuration, we need to run sudo systemctl restart fail2ban to make the change take effect. For more information, you can refer to https://www.fail2ban.org/wiki/index.php/Main_Page


  • 3.7.Configuring Screen Blanking
    You can configure your Debix to use a screen saver or to blank the screen.

    3.7.1 On Console

    When running without a graphical desktop, Debix OS will blank the screen after 5 minutes without user input, e.g. mouse movement or key presses.

    To set the blank screen time, for example, set the time to 1 minute, run the following command:

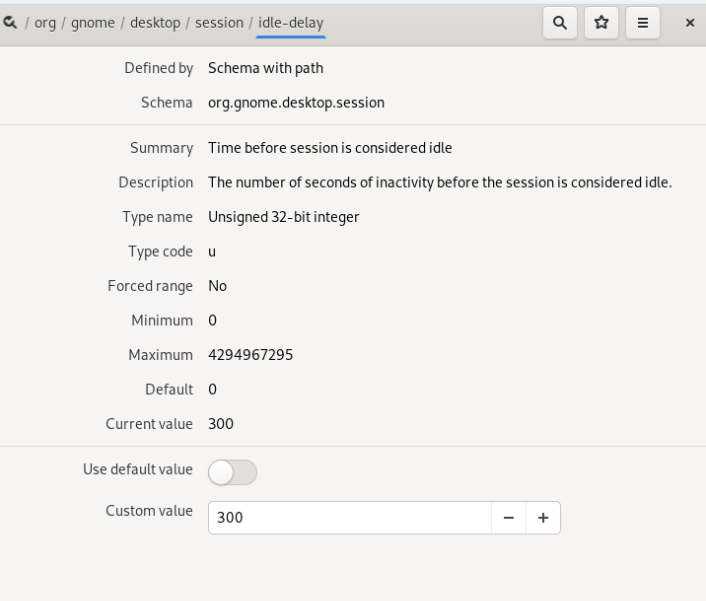
    gsettings set org.gnome.desktop.session idle-delay 60

    You can also use dconf-editor, to use dconf-editor, you need to install it by running sudo apt install dconf-editor, and then run command dconf-editor to launch the GUI, search idle-delay in the launched GUI, and set the time in custom value.

    3.7.2. On the Desktop

    Debix OS will blank the graphical desktop after 5 minutes without user input. You can change the blank screen time in power which is a submenu of Settings.

    There is also a graphical screensaver available, which can be installed as follows:

    sudo apt install xscreensaver

    This may take a few minutes.

    Once this has been installed, you can find the Screensaver application in Show Applications part: it provides many options for setting up the screensaver, including disabling it completely.


The config.txt File
The Linux Kernel
  • 5.1.Kernel
    The Debix kernel is stored in GitHub and can be viewed at github.com/9278978/debix-kernel; it follows behind the main Linux kernel. The main Linux kernel is continuously updating; we take long-term releases of the kernel and integrate the changes into the Debix kernel.
  • 5.2.Building the Kernel

    The default compilers and linkers that come with an OS are configured to build executables to run on that OS - they are native tools - but that doesn’t have to be the case. A cross-compiler is configured to build code for a target other than the one running the build process, and using it is called cross-compilation.

    Cross-compilation of Debix kernel is useful for two reasons:


    • it allows a 64-bit kernel to be built using a 32-bit OS, and vice versa, and
    • even a modest laptop can cross-compile a Debix kernel significantly faster than the Debix itself.


    The instructions below are divided into native builds and cross-compilation; choose the section appropriate for your situation - although there are many common steps between the two, there are also some important differences.

    5.2.1.Building the Kernel Locally

    On a Debix, first install the latest version of Debix OS. Then boot your Debix, plug in Ethernet to give you access to the sources, and log in.

    Note

    kernel compilation occupies much space, thus,we recommend using TF card larger than 32G.
    First install git and the build dependencies:
    sudo apt install git bc bison flex libssl-dev make
    Next get the sources, which will take some time:
    git clone --depth=1 https://github.com/9278978/debix-kernel

    Choosing Sources

    The git clone command above will download the current active branch (the one we are building Debix OS images from) without any history. Omitting the --depth=1 will download the entire repository, including the full history of all branches, but this takes much longer and occupies much more storage.

    To download a different branch (again with no history), use the --branch option:

    git clone --depth=1 --branch <branch> https://github.com/9278978/debix-kernel

    where <branch> is the name of the branch that you wish to download.

    Refer to the original GitHub repository for information about the available branches.

    Kernel Configuration

    Configure the kernel; as well as the default configuration, you may wish to configure your kernel in more detail or apply patches from another source, to add or remove required functionality.

    Apply the Default Configuration

    First, prepare the default configuration by running the following commands:

    The default configuration of Debix is imx_v8_defconfig

    cd debix-kernel

    make imx_v8_defconfig

    Building the Kernel

    Build and install the kernel, modules, and Device Tree blobs; this step takes a relatively long time ;

    The default device tree is imx8mp-evk.dts, according to the add-on boards used and the show requirement, different device tree can be chosen through Add-on Board tool which is located on the desktop of DEBIX.

    make -j4

    sudo make INSTALL_MOD_STRIP=1 modules_install

    sudo cp arch/arm64/boot/dts/freescale/*.dtb /boot/

    sudo cp arch/arm64/boot/Image /boot/

    Reboot the system.

    5.2.2.Cross-Compiling the Kernel

    First, you will need a suitable Linux cross-compilation host. We tend to use Ubuntu; since Debix OS is also a Debian distribution, it means many aspects are similar, such as the command lines.

    You can either do this using VirtualBox (or VMWare) on Windows, or install it directly onto your computer. For reference, you can follow instructions online at Wikihow.

    Install Required Dependencies and Toolchain

    To build the sources for cross-compilation, make sure you have the dependencies needed on your machine by executing:

    sudo apt install git bc bison flex libssl-dev make libc6-dev libncurses5-dev

    If you find you need other things, please submit a pull request to change the documentation.

    Get cross compilation tool

    sudo mkdir /opt/toolchain

    cd /opt/toolchain

    sudo wget https://armkeil.blob.core.windows.net/developer/Files/downloads/gnu-a/9.2-2019.12/binrel/gcc-arm-9.2-2019.12-x86_64-aarch64-none-linux-gnu.tar.xz

    tar xpf gcc-arm-9.2-2019.12-x86_64-aarch64-none-linux-gnu.tar.xz

    export PATH=$PATH:/opt/toolchain/gcc-arm-9.2-2019.12-x86_64-aarch64-none-linux-gnu/bin

    Note

    You need to execute the following command before doing compilation.

    export PATH=$PATH:/opt/toolchain/gcc-arm-9.2-2019.12-x86_64-aarch64-none-linux-gnu/bin

    Get the Kernel Sources


    To download the minimal source tree for the current branch, run:

    git clone --depth=1 https://github.com/9278978/debix-kernel
    See Choosing sources above for instructions on how to choose a different branch

    Build sources

    Enter the following commands to build the sources and Device Tree files

    export PATH=$PATH:/opt/toolchain/gcc-arm-9.2-2019.12-x86_64-aarch64-none-linux-gnu/bin

    cd debix-kernel

    make ARCH=arm64 CROSS_COMPILE=aarch64-none-linux-gnu-  imx_v8_defconfig


    Build with Configs
    Note

    To speed up compilation on multiprocessor systems, and get some improvement on single processor ones, use -j n, where n is the number of processors * 1.5. You can use the nproc command to see how many processors you have. Alternatively, feel free to experiment and see what works!
    Compile kernel dts modules
    Note

    You should be in the debix-kernel repository directory before executing the following commands

    export PATH=$PATH:/opt/toolchain/gcc-arm-9.2-2019.12-x86_64-aarch64-none-linux-gnu/bin

    make ARCH=arm64 CROSS_COMPILE=aarch64-none-linux-gnu-  

    Install Directly onto the SD Card

    Having built the kernel, you need to copy it onto your Debix and install the modules; this is best done directly using an SD card reader. Prepare an SD card with Debix OS installed beforehand.

    First, use lsblk before and after plugging in your SD card to identify it. You should end up with something a lot like this:

    sdb

      sdb1

      sdb2

    with sdb1 being the FAT (boot) partition, and sdb2 being the ext4 filesystem (root) partition.
    Note
    You should be in the first level of debix-kernel repository directory before executing the following commands,i.e., After you run pwd|grep .*debix-kernel$,you could get output like this: /home/debix/debix-kernel
    Mount these first, adjusting the partition number as necessary:

    mkdir mnt

    mkdir mnt/fat32

    mkdir mnt/ext4

    sudo mount /dev/sdb1 mnt/fat32

    sudo mount /dev/sdb2 mnt/ext4

    Note

    You should adjust the drive letter appropriately for your setup, e.g. if your SD card appears as /dev/sdc instead of /dev/sdb.

    You should be in the first level of debix-kernel repository directory before executing the following commands,i.e., After you run pwd|grep .*debix-kernel$,you could get output like this: /home/debix/debix-kernel

    Next, install the kernel modules onto the SD card:

    export PATH=$PATH:/opt/toolchain/gcc-arm-9.2-2019.12-x86_64-aarch64-none-linux-gnu/bin

    sudo env PATH=$PATH make ARCH=arm64 CROSS_COMPILE=aarch64-none-linux-gnu-  INSTALL_MOD_PATH=mnt/ext4 INSTALL_MOD_STRIP=1 modules_install

    sudo umount /mnt/ext4

    Finally, copy the kernel and Device Tree blobs onto the SD card, making sure to back up your old kernel:

    sudo cp mnt/fat32/Image mnt/fat32/Image-backup.img

    sudo cp arch/arm64/boot/Image mnt/fat32/Image

    sudo cp arch/arm64/boot/dts/freescale/imx8mp-evk.dtb mnt/fat32/imx8mp-evk.dtb  

    sudo umount /mnt/fa

    Finally, plug the card into Debix and boot it!
  • 5.3.Configuring the Kernel

    The Linux kernel is highly configurable; advanced users may wish to modify the default configuration to customize it to their needs, such as enabling a new or experimental network protocol, or enabling support for new hardware.

    Configuration is most commonly done through the make menuconfig interface. Alternatively, you can modify your .config file manually, but this can be more difficult for new users.

    5.3.1.Preparing to Configure

    The menuconfig tool requires the ncurses development headers to compile properly. These can be installed with the following command:

    sudo apt install libncurses5-dev
    You’ll also need to download and prepare your kernel sources, as described in the build guide. In particular, ensure you have installed the default configuration.

    5.3.2.Using menuconfig

    Once you’ve got everything set up and ready to go, you can compile and run the menuconfig utility as follows:

    make menuconfig
    Or, if you are cross-compiling a 64-bit kernel:

    export PATH=$PATH:/opt/toolchain/gcc-arm-9.2-2019.12-x86_64-aarch64-none-linux-gnu/bin

    make ARCH=arm64 CROSS_COMPILE=aarch64-none-linux-gnu- menuconfig

    he menuconfig utility has simple keyboard navigation. After a brief compilation, you’ll be presented with a list of submenus containing all the options you can configure; there’s a lot, so take your time to read through them and get acquainted.

    Use the arrow keys to navigate, the Enter key to enter a submenu (indicated by --->), Escape twice to go up a level or exit, and the space bar to cycle the state of an option. Some options have multiple choices, in which case they’ll appear as a submenu and the Enter key will select an option. You can press h on most entries to get help about that specific option or menu.

    Resist the temptation to enable or disable a lot of things on your first attempt; it’s relatively easy to break your configuration, so start small and get comfortable with the configuration and build process.


    5.3.3.Saving your Changes

    Once you’ve done making the changes you want, press Escape until you’re prompted to save your new configuration. By default, this will save to the .config file. You can save and load configurations by copying this file around.
Using Linux
  • 6.1. Terminal
    The terminal (or 'command-line') on a computer allows a user a great deal of control over their system. Users of Windows may already have come across Command Prompt or Powershell, while mac OS users may be familiar with Terminal. All of these tools allow a user to directly manipulate their system through the use of commands. These commands can be chained together and/or combined together into complex scripts that can potentially complete tasks more efficiently than much larger traditional software packages.

    6.1.1. Opening a Terminal Window

    On the Debix OS, the default terminal application is called gnome-terminal. The application can be found on the Debix desktop, and when started will look something like this:

    In the terminal window you should be able to see the following prompt:

    debix@imx8mpevk~ $
    This shows your username and the hostname of the Debix. Here the username is debix and the hostname is imx8mpevk.

    6.1.2. Navigating and Browsing Your Debix

    One of the key aspects of using a terminal is being able to navigate your file system. Go ahead and type ls -la into the Terminal window, and then hit the RETURN key. You should see something similar to:


    The ls command lists the contents of the directory that you are currently in (your present working directory). The -la component of the command is what’s known as a 'flag'. Flags modify the command that’s being run. In this case the l displays the contents of the directory in a list, showing data such as their sizes and when they were last edited, and the a displays all files, including those beginning with a ., known as 'dotfiles'. Dotfiles usually act as configuration files for software and as they are written in text, they can be modified by simply editing them.

    In order to navigate to other directories the change directory command, cd, can be used. You can specify the directory that you want to go to by either the 'absolute' or the 'relative' path. So if you wanted to navigate to the Desktop directory, you could either do cd /home/debix/Desktop or just cd Desktop (if you are currently in /home/debix). There are some special cases that may be useful: ~ acts as an alias for your home directory, so ~/Desktop is the same as /home/debix/Desktop; . and .. are aliases for the current directory and the parent directory respectively, e.g. if you were in /home/debix/Desktop, cd .. would take you to /home/debix.


    6.1.3. History and Auto-complete

    Rather than type every command, the terminal allows you to scroll through previous commands that you’ve run by pressing the up or down keys on your keyboard. If you are writing the name of a file or directory as part of a command then pressing tab will attempt to auto-complete the name of what you are typing. For example, if you have a file in a directory called aLongFileName then pressing tab after typing a will allow you to choose from all file and directory names beginning with a in the current directory, allowing you to choose aLongFileName.

    6.1.4. The sudo Command

    Some commands that make permanent changes to the state of your system require you to have root privileges to run. The command sudo temporarily gives your account (if you’ve not already logged in as root) the ability to run these commands, provided your user name is in a list of users ('sudoers'). When you append sudo to the start of a command and press enter, the command following sudo will be run using root privileges. Be very careful: commands requiring root privileges can irreparably damage your system! Note that on some systems you will be prompted to enter your password when you run a command with sudo.

    Further information on sudo and the root user can be found on the linux root page.

    6.1.5. Installing Software Using apt

    You can use the apt command to install software in Debix OS. This is the 'package manager' that is included with any Ubuntu-based Linux distributions, including Debix OS. It allows you to install and manage new software packages on your Debix.

    In order to install a new package, you would type sudo apt install <package-name>, where <package-name> is the package that you want to install.

    Running sudo apt update will update a list of software packages that are available on your system. If a new version of a package is available, then sudo apt full-upgrade will update any old packages to the new version.

    Finally, sudo apt remove <package-name> removes or uninstalls a package from your system.

    6.1.6. Other Useful Commands

    There are a few other commands that you may find useful, these are listed below:


    • cp makes a copy of a file and places it at the specified location (essentially doing a 'copy-paste'), for example - cp file_a /home/other_user/ would copy the file file_a from your home directory to that of the user other_user (assuming you have permission to copy it there). Note that if the target is a folder, the filename will remain the same, but if the target is a filename, it will give the file the new name.
    • mv moves a file and places it at the specified location (so where cp performs a 'copy-paste', mv performs a 'cut-paste'). The usage is similar to cp, so mv file_a  /home/other_user/ would move the file file_a from your home directory to that of the specified user. mv is also used to rename a file, i.e. move it to a new location, e.g. mv hello.txt story.txt.
    • rm removes the specified file (or directory when used with -r). Warning: Files deleted in this way are generally not restorable.
    • mkdir: This makes a new directory, e.g. mkdir new_dir would create the directory new_dir in the present working directory.
    • cat lists the contents of files, e.g. cat some_file will display the contents of some_file.


    Other commands you may find useful can be found in the commands page.

    6.1.7. Finding out about a Command

    To find out more information about a particular command then you can run the man followed by the command you want to know more about (e.g. man ls). The man-page (or manual page) for that command will be displayed, including information about the flags for that program and what effect they have. Some man-pages will give example usage. (For ubuntu20.04 which Debix used, we need to run sudo unminimize to get man page.)
  • 6.2. The Linux File System
    It is important to have a basic understanding of the fundamentals of the Linux file system: where your files are kept, where software is installed, where the danger zones are, and so on. For more information, please refer to the Linux Filesystem Hierarchy Standard.

    6.2.1. Home

    When you log into a Debix and open a terminal window, or you boot to the command line instead of the graphical user interface, you start in your home folder; this is located at /home/debix, assuming your username is debix.

    This is where the user’s own files are kept. The contents of the user’s desktop is in a directory here called Desktop, along with other files and folders.

    To navigate to your home folder on the command line, simply type cd and press Enter. This is the equivalent of typing cd /home/debix, where debix is your username. You can also use the tilde key (~), for example cd ~, which can be used to relatively link back to your home folder. For instance, cd ~/Desktop/ is the same as cd /home/debix/Desktop.

    Navigate to /home/ and run ls, and you’ll see the home folders of each of the users on the system.

    Note that if logged in as the root user, typing cd or cd ~ will take you to the root user’s home directory; unlike normal users, this is located at /root/ not /home/root/.

  • 6.3. Linux Commands
    Here are some fundamental and common Linux commands with example usage:

    6.3.1 Filesystem

    ls

    The ls command lists the content of the current directory (or one that is specified). It can be used with the -l flag to display additional information (permissions, owner, group, size, date and timestamp of last edit) about each file and directory in a list format. The -a flag allows you to view files beginning with . (i.e. dotfiles).

    cd

    Using cd changes the current directory to the one specified. You can use relative (i.e. cd directoryA) or absolute (i.e. cd /home/debix/directoryA) paths.

    pwd

    The pwd command displays the name of the present working directory: on a Debix, entering pwd will output something like /home/debix.

    mkdir

    You can use mkdir to create a new directory, e.g. mkdir newDir would create the directory newDir in the present working directory.

    rmdir

    To remove empty directories, use rmdir. So, for example, rmdir oldDir will remove the directory oldDir only if it is empty.

    rm

    The command rm removes the specified file (or recursively from a directory when used with -r). Be careful with this command: files deleted in this way are mostly gone for good!

    cp

    Using cp makes a copy of a file and places it at the specified location (this is similar to copying and pasting). For example, cp ~/fileA /home/otherUser/ would copy the file fileA from your home directory to that of the user otherUser (assuming you have permission to copy it there). This command can either take FILE FILE (cp fileA fileB), FILE DIR (cp fileA /directoryB/) or -r DIR DIR (which recursively copies the contents of directories) as arguments.

    mv

    The mv command moves a file and places it at the specified location (so where cp performs a 'copy-paste', mv performs a 'cut-paste'). The usage is similar to cp. So mv ~/fileA /home/otherUser/ would move the file fileA from your home directory to that of the user otherUser. This command can either take FILE FILE (mv fileA fileB), FILE DIR (mv fileA /directoryB/) or DIR DIR (mv /directoryB /directoryC) as arguments. This command is also useful as a method to rename files and directories after they’ve been created.

    touch

    The command touch sets the last modified time-stamp of the specified file(s) or creates it if it does not already exist.

    cat

    You can use cat to list the contents of file(s), e.g. cat thisFile will display the contents of thisFile. Can be used to list the contents of multiple files, i.e. cat *.txt will list the contents of all .txt files in the current directory.

    head

    The head command displays the beginning of a file. Can be used with -n to specify the number of lines to show (by default ten), or with -c to specify the number of bytes.

    tail

    The opposite of head, tail displays the end of a file. The starting point in the file can be specified either through -b for 512 byte blocks, -c for bytes, or -n for number of lines.

    chmod

    You would normally use chmod to change the permissions for a file. The chmod command can use symbols u (user that owns the file), g (the files group) , and o (other users) and the permissions r (read), w (write), and x (execute). Using chmod u+x filename will add execute permission for the owner of the file.

    chown

    The chown command changes the user and/or group that owns a file. It normally needs to be run as root using sudo e.g. sudo chown debix:root filename will change the owner to debix and the group to root.

    ssh

    ssh denotes the secure shell. Connect to another computer using an encrypted network connection. For more details see SSH (secure shell)

    scp

    The scp command copies a file from one computer to another using ssh. For more details see SCP (secure copy)

    sudo

    The sudo command enables you to run a command as a superuser, or another user. Use sudo -s for a superuser shell. For more details see Root user / sudo

    dd

    The dd command copies a file converting the file as specified. It is often used to copy an entire disk to a single file or back again. So, for example, dd if=/dev/sdd of=backup.img will create a backup image from an SD card or USB disk drive at /dev/sdd. Make sure to use the correct drive when copying an image to the SD card as it can overwrite the entire disk.

    df

    Use df to display the disk space available and used on the mounted filesystems. Use df -h to see the output in a human-readable format using M for MBs rather than showing number of bytes.

    unzip

    The unzip command extracts the files from a compressed zip file.

    tar

    Use tar to store or extract files from a tape archive file. It can also reduce the space required by compressing the file similar to a zip file.

    To create a compressed file, use tar -cvzf filename.tar.gz directory/ To extract the contents of a file, use tar -xvzf filename.tar.gz

    pipes

    A pipe allows the output from one command to be used as the input for another command. The pipe symbol is a vertical line |. For example, to only show the first ten entries of the ls command it can be piped through the head command ls | head

    tree

    Use the tree command to show a directory and all subdirectories and files indented as a tree structure. You can install it with APT:

    sudo apt install tree

    &

    Run a command in the background with &, freeing up the shell for future commands.

    wget

    Download a file from the web directly to the computer with wget. So wget https://www.debix.io/public/uploads/files/20220127/68e3735204a9f7e09114e2ee677a7c9e.pdf will download the 68e3735204a9f7e09114e2ee677a7c9e.pdf datasheet and save it as 68e3735204a9f7e09114e2ee677a7c9e.pdf.

    curl

    Use curl to download or upload a file to/from a server. By default, it will output the file contents of the file to the screen. You can install it with APT:

    sudo apt install curl


    6.3.2. Search

    grep

    Use grep to search inside files for certain search patterns. For example, grep "search" *.txt will look in all the files in the current directory ending with .txt for the string search.

    The grep command supports regular expressions which allows special letter combinations to be included in the search.

    awk

    awk is a programming language useful for searching and manipulating text files.

    find

    The find command searches a directory and subdirectories for files matching certain patterns.

    whereis

    Use whereis to find the location of a command. It looks through standard program locations until it finds the requested command.

    6.3.3. Networking

    ping

    The ping utility is usually used to check if communication can be made with another host. It can be used with default settings by just specifying a hostname (e.g. ping debix.io) or an IP address (e.g. ping 114.114.114.114). It can specify the number of packets to send with the -c flag.

    nmap

    nmap is a network exploration and scanning tool. It can return port and OS information about a host or a range of hosts. Running just nmap will display the options available as well as example usage. You can install it with APT:

    sudo apt install nmap

    hostname

    The hostname command displays the current hostname of the system. A privileged (super) user can set the hostname to a new one by supplying it as an argument (e.g. hostname new-host).

    ifconfig

    Use ifconfig to display the network configuration details for the interfaces on the current system when run without any arguments (i.e. ifconfig). By supplying the command with the name of an interface (e.g. eth0 or lo) you can then alter the configuration: check the manual page for more details.


  • 6.4. Text Editors
    On Linux, you have a choice of text editors. Some are easy-to-use but have limited functionality; others require training to use and take a long time to master, but offer incredible functionality.

    6.4.1. Text Editors in the Terminal

    nano

    GNU Nano is at the easy-to-use end of command-line editors. It’s installed by default, so use nano somefile.txt to edit a file, and keyboard shortcuts like Ctrl + O to save and Ctrl + X to exit. You can install it with APT:

    sudo apt install nano

    Vi

    Vi is a very old (c. 1976) command-line editor, which is available on most UNIX systems and is pre-installed on Debix OS. It’s succeeded by Vim (Vi Improved), which requires installation.

    Unlike most editors, Vi and Vim have a number of different modes. When you open Vi with vi somefile.txt, you start in command mode which doesn’t directly permit text entry. Press i to switch to insert mode in order to edit the file, and type away. To save the file you must return to command mode, so press the Escape key and enter :w (followed by Enter), which is the command to write the file to disk.

    To search for the word 'debix' in a file, make sure you’re in command mode (press Escape), then type /debix followed by n and N to flick forwards/backwards through the results.

    To save and exit, enter the command :wq. To exit without saving, enter the command :q!.

    Depending on your keyboard configuration, you may find your cursor keys don’t work. In this case, you can use the H-J-K-L keys (which move left, down, up, and right respectively) to navigate the file in command mode.

    Vim

    Vim is an extension of Vi and works in much the same way, with a number of improvements. If there isn’t a vim in your system, install it with APT:

    sudo apt install vim

    You can edit a file in Vim with vim somefile.txt.

    Emacs

    Emacs is a GNU command-line text editor; it’s powerful, extensible, and customisable. You can install it with APT:

    sudo apt install emacs
    You can use keyboard combination commands, such as Ctrl + X Ctrl + S to save and Ctrl + X Ctrl + C to close.


  • 6.5. Linux Users
    User management in Debix OS is done on the command line. The default user is debix, and the password is debix. You can add users and change each user’s password.

    6.5.1. Changing Your Password

    Once you’ve logged in as the debix user, it is highly advisable to use the passwd command to change the default password to improve your Debix’s security.

    Enter passwd on the command line and press Enter. You’ll be prompted to enter your current password to authenticate, and then asked for a new password. Press Enter on completion and you’ll be asked to confirm it. Note that no characters will be displayed while entering your password. Once you’ve correctly confirmed your password, you’ll be shown a success message (passwd: password updated successfully), and the new password will apply immediately.

    If your user has sudo permissions, you can change another user’s password with passwd followed by the user’s username. For example, sudo passwd bob will allow you to set the user bob's password, and then some additional optional values for the user such as their name. Just press Enter to skip each of these options.

    Remove a User’s Password

    You can remove the password for the user bob with sudo passwd bob -d. Without a password the user will not be able to login to a Terminal.

    Note

    This is useful for users that need to exist for system reasons, but you don’t want it to be possible to login to the account for security reasons.

    6.5.2. Creating a New User

    You can create additional users on your Debix OS installation with the adduser command.

    Enter sudo adduser bob and you’ll be prompted for a password for the new user bob. Leave this blank if you don’t want a password.Your Home FolderWhen you create a new user, they will have a home folder in /home/. The debix user’s home folder is at /home/debix/.

    The skel Command

    Upon creating a new user, the contents of /etc/skel/ will be copied to the new user’s home folder. You can add or modify dot-files such as the .bashrc in /etc/skel/ to your requirements, and this version will be applied to new users.

    6.5.3. Deleting a User

    You can delete a user on your system with the command userdel. Apply the -r flag to remove their home folder too:

    sudo userdel -r bob

  • 6.6. Root and sudo

    The Linux operating system is a multi-user operating system which allows multiple users to log in and use the computer. To protect the computer (and the privacy of other users), the users' abilities are restricted.

    Most users are allowed to run most programs, and to save and edit files stored in their own home folder. Normal users are not normally allowed to edit files in other users' folders or any of the system files. There’s a special user in Linux known as the superuser, which is usually given the username root. The superuser has unrestricted access to the computer and can do almost anyt

    6.6.1. The sudo Command

    You won’t normally log into the computer as root, but you can use the sudo command to provide access as the superuser. If you log into your Debix as the debix user, then you’re logging in as a normal user. You can run commands as the root user by using the sudo command before the program you want to run.

    For example, if you want to install additional software on Debix OS then you normally use the apt tool. To update the list of available software, you need to prefix the apt command with sudo:

    sudo apt update

    You can also run a superuser shell by using sudo su. When running commands as a superuser there’s nothing to protect against mistakes that could damage the system. It’s recommended that you only run commands as the superuser when required, and to exit a superuser shell when it’s no longer needed.

    6.6.2. The sudo’ers List

    The default debix user on Debix Model A OS is a member of the sudo group. This gives the ability to run commands as root when preceded by sudo, and to switch to the root user with sudo su.

    To add a new user to the sudo group, use the adduser command:

    sudo adduser bob sudo

    Note that the user bob will be prompted to enter their password when they run sudo. This differs from the behaviour of the debix user, since debix is not prompted for their password. If you wish to remove the password prompt from the new user, create a custom sudoers file and place it in the /etc/sudoers.d directory.


    • Create the file using sudo visudo /etc/sudoers.d/010_bob-nopasswd.
    • Insert the following contents on a single line: bob ALL=(ALL) NOPASSWD: ALL
    • Save the file and exit.


    Once you have exited the editor, the file will be checked for any syntax errors. If no errors were detected, the file will be saved and you will be returned to the shell prompt. If errors were detected, you will be asked 'what now?' Press the 'enter' key on your keyboard: this will bring up a list of options. You will probably want to use 'e' for '(e)dit sudoers file again', so you can edit the file and fix the problem.

    Note

    Choosing option 'Q' will save the file with any syntax errors still in place, which makes it impossible for any user to use the sudo command.
    Note
    It is standard practice on Linux to have the user prompted for their password when they run sudo, since it makes the system slightly more secure.


  • 6.7. The .bashrc File

    In your home folder you will find a hidden file called .bashrc which contains some user configuration options. You can edit this file to suit your needs. Changes made in this file will be actioned the next time a terminal is opened, since that is when the .bashrc file is read.

    If you want your changes to take place in your current terminal, you can use either source ~/.bashrc or exec bash. These actually do slightly different things: the former simply re-executes the .bashrc file, which may result in undesirable changes to things like the path, the latter replaces the current shell with a new bash shell, which resets the shell back to the state at login, throwing away any shell variables you may have set. Choose whichever is most appropriate.

    Some useful adaptions are provided for you; some of these are commented out with a number sign by default. To enable them, remove the number sign and they will be active next time you boot your Debix or start a new terminal.

    For example, some ls aliases:

    alias ls='ls --color=auto'

    #alias dir='dir --color=auto'

    #alias vdir='vdir --color=auto'


    alias grep='grep --color=auto'

    alias fgrep='fgrep --color=auto'

    alias egrep='egrep --color=auto'

    Aliases like these are provided to help users of other systems like Microsoft Windows (dir is the ls of DOS/Windows). Others are to add colour to the output of commands like ls and grep by default.

    More variations of ls are also provided:

    # some more ls aliases

    #alias ll='ls -l'

    #alias la='ls -A'

    #alias l='ls -CF'

    Ubuntu users may be familiar with these as they are provided by default on that distribution. Uncomment these lines to have access to these aliases in future.


    6.7.1. The .bash_aliases File

    .bashrc also contains a reference to a .bash_aliases file, which does not exist by default. You can add it to provide a handy way of keeping all your aliases in a separate file.

    if [ -f ~/.bash_aliases ]; then

       . ~/.bash_aliases

    fi

    The if statement here checks the file exists before including it.

    Then you just create the file .bash_aliases and add more aliases like so:

    alias gs='git status'
    You can add other things directly to this file, or to another and include that file like the .bash_aliases example above.


  • 6.8. Shell Scripts

    Commands can be combined together in a file which can then be executed. As an example, copy the following into your favourite text editor:

    #!/usr/bin/bash


    while :

    do

    echo Debix Model A!

    done

    Save this with the name fun-script.

    Before you can run it you must first make it executable; this can be done by using the change mode command chmod. Each file and directory has its own set of permissions that dictate what a user can and can’t do to it. In this case, by running the command chmod +x fun-script, the file fun-script will now be executable.

    You can then run it by typing ./fun-script (assuming that it’s in your current directory).

    This script infinitely loops and prints Debix Model A!; to stop it, press Ctrl + C. This kills any command that’s currently being run in the terminal.


  • 6.9. Scheduling Tasks with cron

    Cron is a tool for configuring scheduled tasks on Unix systems. It is used to schedule commands or scripts to run periodically and at fixed intervals. Tasks range from backing up the user’s home folders every day at midnight, to logging CPU information every hour.

    The command crontab (cron table) is used to edit the list of scheduled tasks in operation, and is done on a per-user basis; each user (including root) has their own crontab.

    6.9.1. Editing the crontab File

    Install cron package with the following command:

    sudo apt install cron
    Run crontab with the -e flag to edit the cron table:

    crontab -e
    Note
    The first time you run crontab you’ll be prompted to select an editor; if you are not sure which one to use, choose nano by pressing Enter.

    6.9.2. Adding a Scheduled Task

    The layout for a cron entry is made up of six components: minute, hour, day of month, month of year, day of week, and the command to be executed.

    # m h  dom mon dow   command

    # * * * * *  command to execute

    # ┬ ┬ ┬ ┬ ┬

    # │ │ │ │ │

    # │ │ │ │ │

    # │ │ │ │ └───── day of week (0 - 7) (0 to 6 are Sunday to Saturday, or use names; 7 is Sunday, the same as 0)

    # │ │ │ └────────── month (1 - 12)

    # │ │ └─────────────── day of month (1 - 31)

    # │ └──────────────────── hour (0 - 23)

    # └───────────────────────── min (0 - 59)


    For example:
    0 0 * * *  /home/debix/backup.sh
    This cron entry would run the backup.sh script every day at midnight.

    6.9.3. Viewing Scheduled Tasks

    View your currently saved scheduled tasks with:

    crontab -l

    6.9.4. Erase Scheduled Tasks

    Delete all currently scheduled tasks:

    crontab -r

    6.9.5. Running a Task on Reboot

    To run a command every time the Debix Model A starts up, write @reboot instead of the time and date. For example:

    @reboot python /home/debix/myscript.py
    This will run your Python script every time the Debix reboots. If you want your command to be run in the background while the Debix continues starting up, add a space and & at the end of the line, like this:

    @reboot python /home/debix/myscript.py &

  • 6.10. The systemd Daemon
    In order to have a command or program run when the Debix boots, you can add it as a service. Once this is done, you can start/stop enable/disable from the linux prompt.

    6.10.1. Creating a Service

    On your Debix, create a .service file for your service, for example: myscript.service

    [Unit]

    Description=My service

    After=network.target


    [Service]

    ExecStart=/usr/bin/python3 -u main.py

    WorkingDirectory=/home/debix/myscript

    StandardOutput=inherit

    StandardError=inherit

    Restart=always

    User=debix


    [Install]

    WantedBy=multi-user.target

    So in this instance, the service would run Python 3 from our working directory /home/debix/myscript which contains our python program to run main.py. But you are not limited to Python programs: simply change the ExecStart line to be the command to start any program or script that you want running from booting.

    Create file main.py in directory /home/debix/myscript

    Run chmod +x /home/debix/myscript/main.py to make file main.py executable.

    Copy this service file into /etc/systemd/system as root, for example:

    vsudo cp myscript.service /etc/systemd/system/myscript.service
    Once this has been copied, you have to inform systemd that a new service has been added. This is done with the following command:

    sudo systemctl daemon-reload
    Now you can attempt to start the service using the following command:
    sudo systemctl start myscript.service
    Stop it using following command:

    sudo systemctl stop myscript.service
    When you are happy that this starts and stops your app, you can have it start automatically on reboot by using this command:
    sudo systemctl enable myscript.service
    The systemctl command can also be used to restart the service or disable it from boot up.
    Note
    The order in which things are started is based on their dependencies — this particular script should start fairly late in the boot process, after a network is available (see the After section). You can configure different dependencies and orders based on your requirements.


Remote Access
  • 7.1.Introduction to Remote Access

    Sometimes you need to access a Debix without connecting it to a monitor. Perhaps the Debix is embedded in something like a robot, or you may want to view some information from it from elsewhere. Or perhaps you simply don’t have a spare monitor!

    You can connect to your Debix from another machine. But in order to do so you’ll need to know its IP Address.

    Any device connected to a Local Area Network is assigned an IP address. In order to connect to your Debix from another machine using SSH or VNC, you need to know the Debix’s IP address. This is easy if you have a display connected, and there are a number of methods for finding it remotely from another machine on the network.

    7.1.1.How to Find your IP Address

    It is possible to find the IP address of your Debix without connecting to a screen using one of the following methods:

    Note 

    If you are using a display with your Debix and if you boot to the command line instead of the desktop, your IP address should be shown in the last few messages before the login prompt. Otherwise open a Terminal window and type hostname -I which will reveal your Debix’s IP address.

    Router devices list

    In a web browser navigate to your router’s IP address e.g. http://192.168.1.1, which is usually printed on a label on your router; this will take you to a control panel. Then log in using your credentials, which is usually also printed on the router or sent to you in the accompanying paperwork. Browse to the list of connected devices or similar (all routers are different), and you should see some devices you recognize. Some devices are detected as PCs, tablets, phones, printers, etc. so you should recognize some and rule them out to figure out which is your Debix. Also note the connection type; if your Debix is connected with a wire there should be fewer devices to choose from.

    Resolving imx8mpevk.local with mDNS

    On Debix OS, multicast DNS is supported out-of-the-box by the Avahi service.

    If your device supports mDNS, you can reach your Debix by using its hostname and the .local suffix. The default hostname on a fresh Ubuntu20.04 OS install is imx8mpevk, so by default any Debix running Ubuntu20.04 responds to:

    ing imx8mpevk.local
    If the Debix is reachable, ping will show its IP address:

    PING imx8mpevk.local (192.168.31.97) 56(84) bytes of data.

    64 bytes from 192.168.31.97 (192.168.31.97): icmp_seq=1 ttl=64 time=0.046 ms

    If you change the system hostname of the Debix (e.g., by editing /etc/hostname), Avahi will also change the .local mDNS address.

    If you don’t remember the hostname of the Debix, but have a system with Avahi installed, you can browse all the hosts and services on the LAN with the avahi-browse command.

    nmap command

    The nmap command (Network Mapper) is a free and open-source tool for network discovery, available for Linux, macOS, and Windows.


    • To install on Linux, install the nmap package e.g. apt install nmap.


    • To install on macOS or Windows, see the nmap.org download page.


    To use nmap to scan the devices on your network, you need to know the subnet you are connected to. First find your own IP address, in other words the one of the computer you’re using to find your Debix’s IP address:


    • On Linux, type hostname -I into a terminal window
    • On macOS, go to System Preferences then Network and select your active network connection to view the IP address
    • On Windows, go to the Control Panel, then under Network and Sharing Center, click View network connections, select your active network connection and click View status of this connection to view the IP address


    Now you have the IP address of your computer, you will scan the whole subnet for other devices. For example, if your IP address is 192.168.31.97, other devices will be at addresses like 192.168.31.2, 192.168.31.3, 192.168.31.4, etc. The notation of this subnet range is 192.168.31.0/24 (this covers 192.168.31.0 to 192.168.1.255).

    Now use the nmap command with the -sn flag (ping scan) on the whole subnet range. This may take a few seconds:

    nmap -sn 192.168.31.0/24
    Ping scan just pings all the IP addresses to see if they respond. For each device that responds to the ping, the output are as below:

    Here you can see a device with hostname imx8mpevk has IP address 192.168.31.14. Note, to see the hostnames, you must run nmap as root by prepending sudo to the command.


  • 7.2.Setting up an SSH Server

    You can access the command line of a Debix Model A remotely from another computer or device on the same network using the Secure Shell (SSH) protocol.

    You will only have access to the command line, not the full desktop environment. For a full remote desktop, see VNC.

    7.2.1.Set up your Local Network

    Make sure your Debix is properly set up and connected. If you are using wireless networking, this can be enabled via the desktop user interface, or using from the command line. If you are not using wireless connectivity, plug your Debix directly into the router.

    Note

    You will need to note down the IP address of your Debix in order to connect to it later. Using the ifconfig command will display information about the current network status, including the IP address, or you can use hostname -I to display the IP addresses associated with the device.

    7.2.2.Enabling the Server

    The SSH server is enabled by default on Ubuntu20.04 which Debix Model A used.
  • 7.3.Secure Shell from Linux or Mac OS

    You can use SSH to connect to your Debix from a Linux desktop, another Debix, or from an Apple Mac without installing additional software.

    Open a terminal window on your computer replacing <IP> with the IP address of the Debix you’re trying to connect to,

    ssh debix@<IP>
    When the connection works you will see a security/authenticity warning. Type yes to continue. You will only see this warning the first time you connect.
    Note 

    If you receive a connection timed out error it is likely that you have entered the wrong IP address for the Debix.
    Warning

    In the event your Debix has taken the IP address of a device to which your computer has connected before (even if this was on another network), you may be given a warning and asked to clear the record from your list of known devices. Following this instruction and trying the ssh command again should be successful.

    Next you will be prompted for the password for the debix login: the default password on Debix Model A OS is debix.

    For security reasons it is highly recommended to change the default password on the Debix (also, you can not login through ssh if the password is blank). You should now be able to see the Debix prompt, which will be identical to the one found on the Debix itself.

    If you have set up another user on the Debix, you can connect to it in the same way, replacing the username with your own, e.g. eben@192.168.31.5

    debix@imx8mpevk ~ $
    You are now connected to the Debix remotely, and can execute commands.

  • 7.4.Secure Shell from Windows 10

    You can use SSH to connect to your Debix from a Windows 10 computer that is using October 2018 Update or later without having to use third-party clients.

    Open a terminal window on your computer replacing <IP> with the IP address of the Debix you’re trying to connect to,

    ssh debix@<IP>

    When the connection works you will see a security/authenticity warning. Type yes to continue. You will only see this warning the first time you connect.

    Note

    If you receive a connection timed out error it is likely that you have entered the wrong IP address for the Debix.
    Warning

    In the event your Debix has taken the IP address of a device to which your computer has connected before (even if this was on another network), you may be given a warning and asked to clear the record from your list of known devices. Following this instruction and trying the ssh command again should be successful.

    Next you will be prompted for the password for the debix login: the default password on Debix OS is debix.

    For security reasons it is highly recommended to change the default password on the Debix (also, you can not login through ssh if the password is blank). You should now be able to see the Debix prompt, which will be identical to the one found on the Debix itself.

    If you have set up another user on the Debix, you can connect to it in the same way, replacing the username with your own, e.g. eben@192.168.1.5

    debix@imx8mpevk:~ $
    You are now connected to the Debix remotely, and can execute commands.

  • 7.5.Passwordless SSH Access
    It is possible to configure your Debix to allow access from another computer without needing to provide a password each time you connect. To do this, you need to use an SSH key instead of a password. To generate an SSH key:

    7.5.1.Checking for Existing SSH Keys

    First, check whether there are already keys on the computer you are using to connect to the Debix:

    ls ~/.ssh
    If you see files named id_rsa.pub or id_dsa.pub then you have keys set up already, so you can skip the 'Generate new SSH keys' step below.

    7.5.2.Generate new SSH Keys

    To generate new SSH keys enter the following command:

    ssh-keygen

    Upon entering this command, you will be asked where to save the key. We suggest saving it in the default location (~/.ssh/id_rsa) by pressing Enter.

    You will also be asked to enter a passphrase, which is optional. The passphrase is used to encrypt the private SSH key, so that if someone else copied the key, they could not impersonate you to gain access. If you choose to use a passphrase, type it here and press Enter, then type it again when prompted. Leave the field empty for no passphrase.

    Now look inside your .ssh directory:

    ls ~/.ssh
    and you should see the files id_rsa and id_rsa.pub:
    authorized_keys  id_rsa  id_rsa.pub  known_hosts

    The id_rsa file is your private key. Keep this on your computer.

    The id_rsa.pub file is your public key. This is what you share with machines that you connect to: in this case your Debix. When the machine you try to connect to matches up your public and private key, it will allow you to connect.

    Take a look at your public key to see what it looks like:

    cat ~/.ssh/id_rsa.pub
    It should be in the form:
    ssh-rsa <REALLY LONG STRING OF RANDOM CHARACTERS> user@host


    7.5.3.Copy your Key to your Debix

    Using the computer which you will be connecting from, append the public key to your authorized_keys file on the Debix by sending it over SSH:

    ssh-copy-id <USERNAME>@<IP-ADDRESS>

    Alternatively, if ssh-copy-id is not available on your system, you can copy the file manually over SSH:

    Note

    During this step you will need to authenticate with your password.
    Alternatively, if ssh-copy-id is not available on your system, you can copy the file manually over SSH:
    cat ~/.ssh/id_rsa.pub | ssh <USERNAME>@<IP-ADDRESS> 'mkdir -p ~/.ssh && cat >> ~/.ssh/authorized_keys'

    If you see the message ssh: connect to host <IP-ADDRESS> port 22: Connection refused and you know the IP-ADDRESS is correct, then you may not have enabled SSH on your Debix.

    If you are using windows, download WinSCP to transfer the file ‘id_rsa.pub’ to Debix and add the context of file ‘id_rsa.pub’ to file ‘~/.ssh/authorized_keys’. If file ‘~/.ssh/authorized_keys’ does not exist, create directory ~/.ssh and file ~/.ssh/authorized_keys manually, then add the content of file ‘id_rsa.pub’ to ~/.ssh/authorized_keys.

    Now try ssh <USER>@<IP-ADDRESS> and you should connect without a password prompt.

    If you see a message "Agent admitted failure to sign using the key" then add your RSA or DSA identities to the authentication agent ssh-agent then execute the following command:

    ssh-add
    Note
    you can also send files over SSH using the scp (secure copy) command.


  • 7.6.Using Secure Copy

    Secure Copy (scp) is a command for sending files over SSH. This means you can copy files between computers, say from your Debix to your desktop or laptop, or vice-versa.

    First of all, you’ll need to know your Debix’s IP address.

    7.6.1.Copying Files to your Debix

    Copy the file myfile.txt from your computer to the debix user’s home folder of your Debix at the IP address 192.168.1.3 with the following command:

    scp myfile.txt debix@192.168.1.3:project/

    7.6.2.Copying Files from your Debix

    Copy the file myfile.txt from your Debix to the current directory on your other computer:

    scp debix@192.168.1.3:myfile.txt .

    7.6.3.Copying Multiple Files

    Copy multiple files by separating them with spaces:

    scp myfile.txt myfile2.txt debix@192.168.1.3:
    Alternatively, use a wildcard to copy all files matching a particular search with:
    scp *.txt debix@192.168.1.3:
    (all files ending in .txt)
    scp m* debix@192.168.1.3:
    (all files starting with m)
    scp m*.txt debix@192.168.1.3:
    (all files starting with m and ending in .txt)

    Note

    Some of the examples above will not work for file names containing spaces. Names like this need to be enclosed in quotes:

    scp "my file.txt" debix@192.168.1.3:

    7.6.4.Copying a Whole Directory

    Copy the directory project/ from your computer to the debix user’s home folder of your Debix at the IP address 192.168.1.3 with the following command:

    scp -r project/ debix@192.168.1.3:

  • 7.7.Using rsync

    You can use the tool rsync to synchronise folders between computers. You might want to transfer some files from your desktop computer or laptop to your Debix, for example, and for them to be kept up to date, or you might want the pictures taken by your Debix transferred to your computer automatically.

    Using rsync over SSH allows you to transfer files to your computer automatically.

    Here is an example of how to set up the sync of a folder of pictures on your Debix to your computer:

    On your computer, create a folder called camera:

    mkdir camera

    Look up the Debix’s IP address by logging in to it and running hostname -I. In this example, the Debix is creating a timelapse by capturing a photo every minute, and saving the picture with a timestamp in the local folder camera on its SD card.

    If there is no rsync command on your computer, install it, for example, if you are using Ubuntu, run the following command to install it:

    sudo apt install rsync
    Now run the following command (substituting your own Debix’s IP address):
    rsync -avz -e ssh debix@192.168.1.10:camera/ camera/
    This will copy all files from the Debix’s camera folder to your computer’s new camera folder.

  • 7.8.Network File System (NFS)

    Network File System (NFS) allows you to share a directory located on one networked computer with other computers or devices on the same network. The computer where the directory is located is called the server, and computers or devices connecting to that server are called clients. Clients usually mount the shared directory to make it a part of their own directory structure. The shared directory is an example of a shared resource or network share.

    For smaller networks, an NFS is perfect for creating a simple NAS (Network-attached storage) in a Linux/Unix environment.

    An NFS is perhaps best suited to more permanent network-mounted directories, such as /home directories or regularly-accessed shared resources. If you want a network share that guest users can easily connect to, Samba is better suited to the task. This is because tools to temporarily mount and detach from Samba shares are more readily available across old and proprietary operating systems.

    Before deploying an NFS, you should be familiar with:

    • Linux file and directory permissions
    • mounting and unmounting filesystems

    7.8.1.Setting up a Basic NFS Server

    Install the packages required using the command below:

    sudo apt install nfs-kernel-server

    For easier maintenance, we will isolate all NFS exports in single directory, into which the real directories will be mounted with the --bind option.

    Suppose we want to export our users' home directories, which are in /home/users. First we create the export filesystem:

    sudo mkdir -p /export/users
    Note that /export and /export/users will need 777 permissions, as we will be accessing the NFS share from the client without LDAP/NIS authentication. This will not apply if using authentication (see below). Now mount the real users directory with:

    sudo mount --bind /home/users /export/users
    To save us from retyping this after every reboot, we add the following line to /etc/fstab:
    /home/users    /export/users   none    bind  0  0

    There are three configuration files that relate to an NFS server:

    1. /etc/default/nfs-kernel-server

    2. /etc/default/nfs-common

    3. /etc/exports

    The only important option in /etc/default/nfs-kernel-server for now is NEED_SVCGSSD. It is set to "no" by default, which is fine, because we are not activating NFSv4 security this time.

    In order for the ID names to be automatically mapped, the file /etc/idmapd.conf must exist on both the client and the server with the same contents and with the correct domain names. Furthermore, this file should have the following lines in the Mapping section:

    [Mapping]


    Nobody-User = nobody

    Nobody-Group = nogroup

    However, note that the client may have different requirements for the Nobody-User and Nobody-Group. For example, on RedHat variants, it is nfsnobody for both. If you’re not sure, check via the following commands to see if nobody and nogroup are there:

    cat /etc/passwd

    cat /etc/group

    This way, server and client do not need the users to share same UID/GUID. For those who use LDAP-based authentication, add the following lines to the idmapd.conf of your clients:

    [Translation]


    Method = nsswitch

    This will cause idmapd to know to look at nsswitch.conf to determine where it should look for credential information. If you have LDAP authentication already working, nsswitch shouldn’t require further explanation.

    To export our directories to a local network 192.168.31.0/24, we add the following two lines to /etc/exports:

    /export       192.168.31.0/24(rw,fsid=0,insecure,no_subtree_check,async)

    /export/users 192.168.31.0/24(rw,nohide,insecure,no_subtree_check,async)

    Finally, to make your changes take effect, restart the service:

    sudo systemctl restart nfs-kernel-server

    7.8.2.Configuring an NFS Client

    Now that your server is running, you need to set up any clients to be able to access it. To start, install the required packages:

    sudo apt install nfs-common
    On the client, we can mount the complete export tree with one command:

    sudo mount -t nfs -o proto=tcp,port=2049 <nfs-server-IP>:/ /mnt

    You can also specify the NFS server hostname instead of its IP address, but in this case you need to ensure that the hostname can be resolved to an IP on the client side. A robust way of ensuring that this will always resolve is to use the /etc/hosts file.

    Note that <nfs-server-IP>:/export is not necessary in NFSv4, as it was in NFSv3. The root export :/ defaults to export with fsid=0.

    We can also mount an exported subtree with:

    mount -t nfs -o proto=tcp,port=2049 <nfs-server-IP>:/users /home/users
    To ensure this is mounted on every reboot, add the following line to /etc/fstab:
    <nfs-server-IP>:/   /mnt   nfs    auto  0  0
    If, after mounting, the entry in /proc/mounts appears as <nfs-server-IP>:// (with two slashes), then you might need to specify two slashes in /etc/fstab, or else umount might complain that it cannot find the mount.


  • 7.9.Samba (SMB/CIFS)

    Samba is an implementation of the SMB/CIFS networking protocol that is used by Microsoft Windows devices to provide shared access to files, printers, and serial ports.

    You can use Samba to mount a folder shared from a Windows machine so it appears on your Debix, or to share a folder from your Debix so it can be accessed by your Windows machine.

    7.9.1.Installing Samba Support

    By default, Debix OS does not include CIFS/Samba support, but this can be added. The following commands will install all the required components for using Samba as a server or a client.

    sudo apt update

    sudo apt install samba samba-common-bin smbclient cifs-utils

    7.9.2.Mount a Folder Shared from Windows

    First, you need to share a folder on your Windows device. This is quite a convoluted process!

    Turn on sharing

    1. Open the Networking and Sharing Centre by right-clicking on the system tray and selecting it

    2. Click on Change advanced sharing settings

    3. Select Turn on network discovery

    4. Select Turn on file and printer sharing

    5. Save changes

    Share the folder

    You can share any folder you want, but for this example, simply create a folder called share.

    1. Create the folder share on your desktop.

    2. Right-click on the new folder, and select Properties.

    3. Click on the Sharing tab, and then the Advanced Sharing button

    4. Select Share this folder; by default, the share name is the name of the folder

    5. Click on the Permissions button

    6. For this example, select Everyone and Full Control (you can limit access to specific users if required); click OK when done, then OK again to leave the Advanced Sharing page

    7. Click on the Security tab, as we now need to configure the same permissions

    8. Select the same settings as the Permissions tab, adding the chosen user if necessary

    9. Click OK

    The folder should now be shared.Windows 10 Sharing WizardOn Windows 10 there is a Sharing Wizard that helps with some of these steps.

    1. Run the Computer Management application from the Start Bar

    2. Select Shared Folders, then Shares

    3. Right-click and select New Share, which will start up the Sharing Wizard; click Next

    4. Select the folder you wish to share, and click Next

    5. Type in share name and click Next to use all the sharing defaults

    6. Set the required permissions, and click Finish

    Mount the folder on Debix

    Mounting in Linux is the process of attaching a folder to a location, so firstly we need that location.

    mkdir windowshare
    Now, we need to mount the remote folder to that location. The remote folder is the host name or IP address of the Windows PC, and the share name used when sharing it. We also need to provide the Windows username that will be used to access the remote machine.

    sudo mount.cifs //<hostname or IP address>/share /home/debix/windowshare -o user=<name>
    You should now be able to view the content of the Windows share on your Debix.

    cd windowshare

    ls

    "Host is down" error

    This error is caused by a combination of two things: A SMB protocol version mismatch, and the CIFS client on Linux returning a misleading error message. In order to fix this a version entry needs to be added to the mount command. By default, Debix OS will use version4.13.17-Ubuntu. Older devices, including some NAS, may require version 1.0:

    sudo mount.cifs //IP/share /mnt/point -o user=<uname>,vers=1.0
    You may need to try different versions to match up with the server version. Possible values are:
    Version
    Description
    1.0
    Classic CIFS/SMBv1 protocol
    2.0
    The SMBv2.002 protocol. Windows Vista Service Pack 1, and Windows Server 2008
    2.1
    The SMBv2.1 protocol. Microsoft Windows 7 and Windows Server 2008R2
    3.0
    The SMBv3.0 protocol. Microsoft Windows 8 and Windows Server 2012
    3.02
    The SMBv3.0 protocol. Microsoft Windows 8 and Windows Server 2012
    3.11
    The SMBv3.1.1 protocol. Microsoft Windows 10 and Windows Server 2016
    3
    The SMBv3.0 protocol version and above

    7.9.3.Sharing a Folder from your Debix to Windows10

    Debix configurations

    Firstly, create a folder to share. This example creates a folder called shared in the home folder of the current user, and assumes the current user is debix.

    cd ~

    mkdir shared

    chmod 0740 shared

    Note
    Sometimes after sharing using samba from debix, on windows10, we cannot operate on the shared directory( it notifies that we do not have permission), we need to run chmod 777 shared (substitute shared to the directory you create in your computer) to operate on it.
    Now we need to tell Samba that there is a debix user when accessing that folder. When asked, enter the password of the debix user - this can be the default password, but that is well known and should be changed for better security.
    sudo smbpasswd -a debix
    Now we need to tell Samba to share this folder, using the Samba configuration file.
    sudo nano /etc/samba/smb.conf
    At the end of the file, add the following to share the folder, giving the remote user read/write permissions:

    [share]

       path = /home/debix/shared

       read only = no

       public = yes

       writable = yes

    In the same file, find the workgroup line, and if necessary, change it to the name of the workgroup of your local Windows network.
    workgroup = <your workgroup name here>
    That should be enough to share the folder. On your Window10, when you browse the network(type \\<your debix ip > in the search bar), the folder should appear and you should be able to connect to it.

  • 7.10.Setting up an Apache Web Server

    Apache is a popular web server application you can install on the Debix to allow it to serve web pages.

    On its own, Apache can serve HTML files over HTTP, and with additional modules can serve dynamic web pages using scripting languages such as PHP.

    7.10.1.Installing Apache

    First, update the available packages by typing the following command into the Terminal:

    sudo apt update
    Then, install the package apache2 with this command:
    sudo apt install apache2 -y

    7.10.2.Test the Web Server

    By default, Apache puts a test HTML file in the web folder. This default web page is served when you browse to http://localhost/ on the Debix itself, or http://192.168.1.10 (whatever the Debix’s IP address is) from another computer on the network. To find the Debix’s IP address, type hostname -I at the command line (or read more about finding your IP address).

    Browse to the default web page either on the Debix or from another computer on the network and you should see the following:


    This means you have Apache working!

    Changing the Default Web Page

    This default web page is just an HTML file on the filesystem. It is located at /var/www/html/index.html.

    Navigate to this directory in a terminal window and have a look at what’s inside:

    cd /var/www/html

    ls -al

    This will show you:


    total 12

    drwxr-xr-x  2 root root 4096 Jan  8 01:29 .

    drwxr-xr-x 12 root root 4096 Jan  8 01:28 ..

    -rw-r--r--  1 root root  177 Jan  8 01:29 index.html

    This shows that by default there is one file in/var/www/html/ called index.html and it is owned by the user root(as is the enclosing folder). In order to edit the file, you need to change its ownership to your own username. Change the owner of the file (the default user debix is assumed here) using sudo chown debix:debix index.html.

    You can now try editing this file and then refreshing the browser to see the web page change. If you know HTML you can put your own HTML files and other assets in this directory and serve them as a website on your local network.


    7.10.3.Installing PHP for Apache

    To allow your Apache server to process PHP files, you’ll need to install the latest version of PHP and the PHP module for Apache. Type the following command to install these:

    sudo apt install php libapache2-mod-php -y
    Now remove the file:index.html
    sudo rm index.html
    and create the file :index.php
    sudo nano index.php
    Put some PHP content in it:
    <?php echo "hello world"; ?>
    Now save and refresh your browser. You should see "hello world". This is not dynamic but still served by PHP. Try something dynamic:
    <?php echo date('Y-m-d H:i:s'); ?>
    or show your PHP info:
    <?php phpinfo(); ?>

Compute Module Hardware
Processors